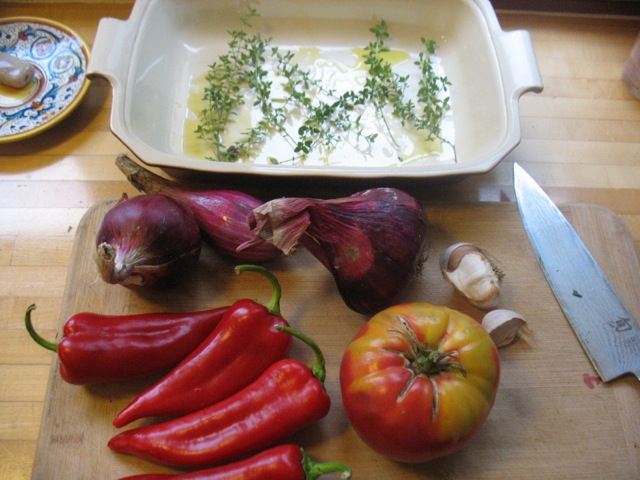
The beautiful beginnings.
The first day, prepared according to Deborah Madison’s simple recipe in Vegetable Literacy, it was delicious. The second day (breakfast) it was even better with a fried egg, and the third day it turned into a most memorable pasta sauce. This most versatile and rewarding dish is Deborah’s sweet pepper and onion tian. My only other reference for a tian had been Julia Child’s zucchini and rice tian which is delicious but bears little resemblance to this late summer pleasure.
Here you gently roast torpedo onions (or plain red onions or any onions you have for that matter) with sprigs of thyme, sweet peppers, garlic and a few tomatoes–for 90 minutes. Then you reduce the liquid that accumulates in the baking dish with a touch of vinegar on the stove top and then toss the perfectly tender vegetables with the reduction. It’s the kind of thing I could, and did, eat three times a day, for days, albeit in various incarnations.
It’s the slow, extended cooking time that brings out the flavors and textures of the vegetables that my often quick, thrown-together, summer dishes lack. It begs to be eaten slowly and relished–something I actually don’t do often enough.
I’m sure I’ll play with this technique with other vegetables but frankly there’s something to be said for making this just as Deborah suggests. You need the liquid from the tomatoes and the peppers and onions keep their shape while the tomatoes melt. The vinegar is the perfect counterpoint and complement to the sweetness of everything else. So, make it! And make plenty!

After 90 minutes in the oven.
Sweet Pepper and Onion Tian
–slightly adapted from Vegetable Literacy by Deborah Madison
Oh my goodness this is good. All you need is some time. The preparation is dead simple but it takes 90 minutes to bake. It’s just as good or better the next day so you could make it one night while you’re making something else for dinner and then have it the next day.
3-4 small-ish torpedo onions or red onions or any onions you have
3 sweet red peppers
2 medium-sized ripe tomatoes
1 to 2 tablespoons olive oil
5 to 6 thyme branches or several pinches of dried
6 small garlic cloves, peeled and left whole
Salt
Freshly ground pepper
1 1/2 teaspoons red wine, sherry or balsamic vinegar (or to taste)
Preheat the oven to 350 F.
Quarter the onions, leaving the base intact, and peel them. Halve the peppers both crosswise and lengthwise, remove the seeds and veins, and cut them into pieces roughly 1/2 inch wide. Remove the core from the tomatoes and cut them into sixths.
Brush a bit of olive oil over the bottom of a gratin dish, scatter the thyme over it, and add the vegetables, including the garlic and arrange in the dish. Drizzle the remaining oil over the vegetables, being sure to coat the onions and peppers. Season with salt and pepper.
Cover the tian and bake for 1 1/2 hours. The vegetables should be very soft, the tomatoes melting into a jam. Remove it from the oven and carefully pour the liquid that has collected into a small saucepan. Add a teaspoon of vinegar, bring the liquid to a boil, and reduce until it is thick and syrupy. Taste for vinegar and salt; then pour this syrup over the vegetables.
Deborah suggests serving this with slices of grilled polenta or piled on top of grilled bread that has been spread first with a layer of garlic mayonnaise. See above post for further ways to use, i.e. with a fried egg or blended into a smooth pasta sauce, etc.
Serve warm or at room temperature.
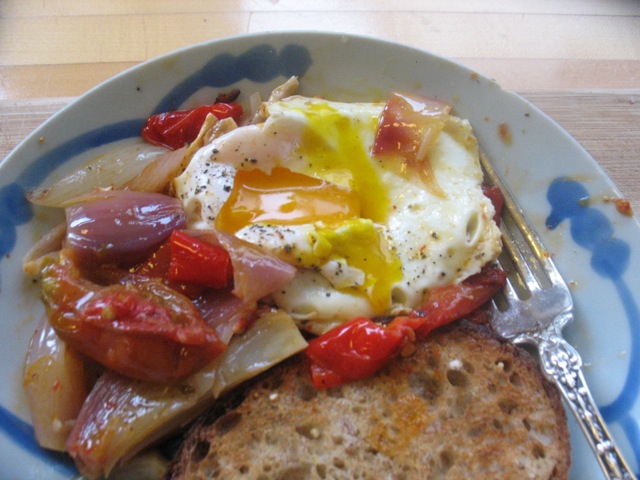
For breakfast with an egg.
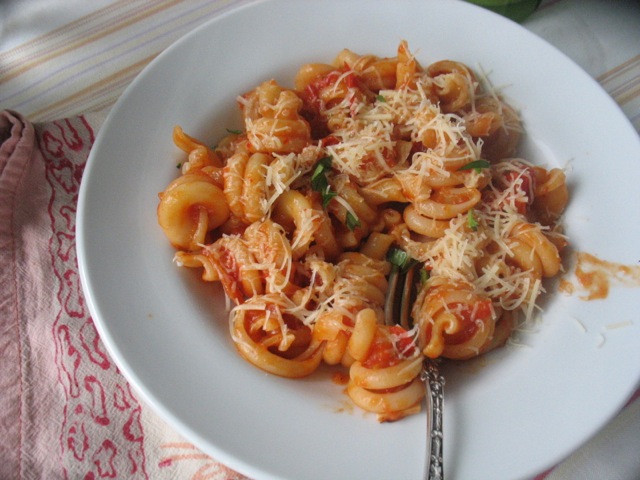
For dinner with pasta and basil.