Blog

Hazelnut Honey Tart

Hazelnut Honey Tart

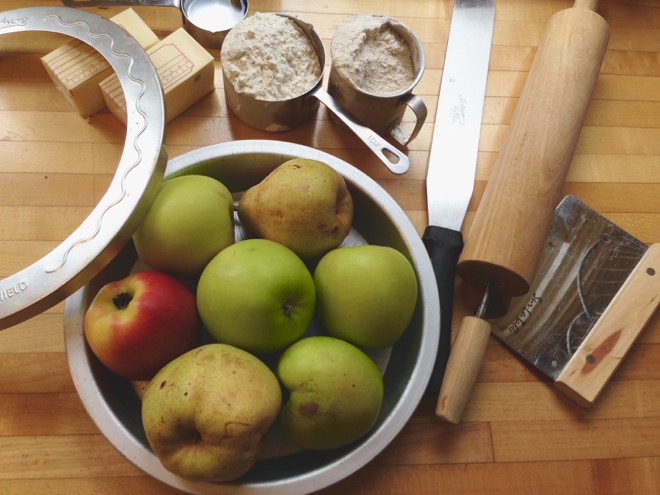
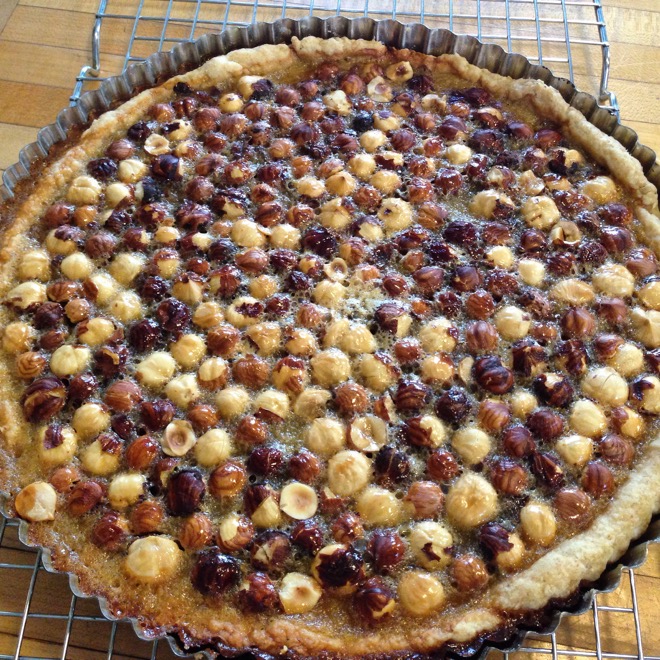
Filbert and Honey Tart
–inspired by a recipe of Piper Davis’ (owner of Grand Central Bakery) in The Chef’s Collaborative Cookbook by Ellen Jackson

This is a simple, rich tart. It’s sort of the Oregon version of a pecan pie but much less sweet and with a higher nut to custard ratio. You’ll need a 10-inch tart pan with removable bottom.

Serves 10 +

½ recipe of this pie dough made with 1/2 whole wheat pastry flour and 1/2 all purpose flour (or your favorite pie/tart dough)
2 cups toasted filberts*
Scant ¾ cup honey
½ cup butter (1 stick/8 tablespoons)
Generous 1/3 cup heavy cream
Scant ¼ teaspoon coarse sea salt
2 eggs
1 teaspoon vanilla extract
1 tablespoon whiskey or bourbon (optional)
Lightly sweetened whipped cream, for serving

Preheat oven to 350 degrees.

Toast filberts in a 350-degree oven for about 20 minutes until very fragrant and a couple shades darker. Cool and then rub off as many skins as you can.

Roll out the dough into an 11-inch or slightly larger round. Press the dough into a 10-inch tart pan with a removable bottom. Press the dough carefully into the base and up the sides and fold any overhang back over onto itself and integrate back into sides and set in the freezer for 5 minutes. Prick the base of the dough half-a-dozen times with fork.

Place a piece of parchment paper or a buttered piece of foil onto the chilled dough. Fill the tart with pie weights or dry beans. Place the tart pan on a baking sheet and bake for 20-25 minutes until the crust is just beginning to color. Remove tart from oven and remove paper or foil and pie weights. Leave tart on the baking sheet.

While the tart crust is blind baking make the filling.

Heat the honey and butter in a heavy saucepan until boiling. Boil it hard for a minute and then whisk in the cream. It will bubble up significantly. Pour the caramel into a bowl. Whisk occasionally to speed cooling. When no longer hot, whisk in the salt, vanilla and whiskey, if using. Then whisk in the eggs one at a time.

Turn the oven down to 325.

Cover the bottom of the pre-baked tart with the filberts. Carefully pour the custard over the nuts and put the tart, still on the baking sheet, in the oven. Bake for 20 – 25 minutes until custard is just set. Cool completely on a rack.
Serve with lightly sweetened whipped cream.


Scraps, Leftovers, Odd Bits. . . and How to Use What We Have

caesar salad

People tend to give me food. One friend always passes on his green onion tops after he uses the white parts for curry pastes. Last weekend I left a party with a jar of leftover Caesar salad dressing and a bag of extra croutons. A neighbor gave me a head of lettuce on its last legs the other day. I love these bits. They are the fodder for my cook-with-what-you-have kitchen and my deep-seeded joy in making something out of nothing.  People seem to know that I’ll both use and appreciate them, which I in turn, appreciate!

These gifts bestowed on me have me thinking both about how much many of us have and how simple it can be to eat well if you have access to the basics. There’s been a lot of writing and discussion about wasted food (or more commonly referred to as food waste though I think the semantics are important) this year. It is a huge and critical topic and I am beginning to think about how this blog and all my Cook With What You Have work, can more explicitly be a resource for decreasing waste and sharing our bounty with others.

So, whether you have an appreciative friend or neighbor or want to get more creative yourself, I am eager to talk more about how we can use all we buy to the fullest and how we can share our bounty with those in need.

Wishing you a very happy, resourceful and fulfilling holiday season!

P.S. If someone on your gift list this season likes to cook or might be looking for inspiration in the kitchen, with vegetables, or likes to cook with their family, a gift subscription to the Cook With What You Have Seasonal Recipe Collection might just be the ticket! It won’t clutter anyone’s closet and it is the gift that keeps on giving. . . in the best of ways!

Caesar Salad

Whether you use the classic Romaine or use the Escarole or any of the other hardy chicories that are this season’s salad greens here in the Pacific Northwest, this is a lovely dish to brighten up any holiday meal.

I can eat just this for dinner. It’s tangy and fresh and rich from the egg in the dressing. The little bit of anchovy rounds things out without being overpowering. Good, fresh eggs from happy chickens will make it even better.

Serves 4-6 depending on appetites and what else is being served

2/3 cup grated Parmesan cheese, divided
2-3 tablespoons freshly squeezed lemon juice
3 tablespoons good olive oil
4-5 garlic cloves, finely chopped
4-5 flat anchovy filets (or more to taste)
1 egg yolk
1/2 teaspoon sea salt (or more to taste)
Freshly grated black pepper
1/4 teaspoon dry mustard (optional)
1 large head of Romaine lettuce, washed, leaves cut in half lengthwise and then cut into 1 1/2 inch ribbons or Sugarloaf, Escarole or any other hearty lettuce
1 1/2 cups croutons or toast a slice or two of good crusty bread and tear it into bite-sized pieces

You can either use a food processor or a mortar and pestle. If using the latter, put the garlic, anchovy, pepper and salt in it and pound it into a smooth-ish paste. Scoop the paste out of the mortar and put it into a bowl. Then whisk in the lemon juice and egg yolk and then slowly add the oil and finally 1/2 cup of the Parmesan. If using a food processor start with the garlic, anchovy, lemon juice and salt and then add the ingredients in the same order. Stir the parmesan at the end after you’ve removed the dressing from the processor.

Toss dressing with lettuce, top with croutons and some more freshly grated Parmesan.

Mustard Greens & Broccoli & a Survey

broccoli and white beansThese are the green bits of inspiration I’ve had all week thanks to my neighborhood farmers’ market. I document all these experiments as I continue to improve my Seasonal Recipe Collection to provide a deep, beautiful resource to anyone who likes to cook, wants to cook more, eat more vegetables, get out of a rut, save money, etc. And here’s a super short survey I’d love to have you fill out if you do subscribe to the Recipe Collection (and you’ll be entered to win a treat from me)! And if you don’t, maybe you’d like to subscribe or give a subscription to a friend as a gift that does not add clutter but makes for happy eaters!

Now back to the green inspiration . . . A pot of white beans, mostly destined for a soup to take to a friend who recently had a baby, turned into a quick lunch with nothing more than broccoli, salt and a little olive oil.

Israeli couscous with broccoli and sharp cheddar that I’d made for my son’s school lunch made enough that I could have it for lunch one day enlivened with thinly sliced, fresh mustard greens and more good olive oil.

israeli couscous with mustard greens

Said white beans were re-heated and also complemented by fresh mustard greens, hot pepper and olive oil.

Testing a new savory tart crust recipe the filling became sautéed mustard greens, garlic, eggs, nutmeg and a little milk.

Broccoli and cauliflower sautéed with cumin seeds and a bit of hot pepper and cooked until nicely browned and fragrant made a lovely side.

And finally today I made up a curry of daikon and mustard greens to populate the new “daikon” page on my Seasonal Recipe Collection.  Daikon is fairly new to me and I’m finding all sorts of delicious ways to use this radish in the brassica family that is loaded with Vitamin C, calcium and also sorts of good things, not to mention plenty of crunch!

daikon mustard green curry

These things all took minutes to make and were good, simple dishes. The vegetables were flavorful and bright and I’m reminded, as I am every winter, just what vibrant, green vegetables we have in addition to the fabulously flexible and nourishing winter squashes and roots.

Happy cooking!

Apple Pie

apple pie ingredients IIPumpkin takes center stage, as does pecan typically but good old apple pie holds its own on any festive table. Mix and match whatever apples you might have on hand, toss in a pear or a quince, or stir in 1/2 cup of apricot jam and watch as people gasp and exclaim over how perfect and mysteriously fabulous your pie is! The cook-with-what-you-have philosophy lends itself beautifully to pie! I will be adding a good dollop of Italian prune compote to my sour cherry pie this week too.

PIE CLASS? I love really good pie (crust) and am contemplating teaching a pie class in the next few weeks. Let me know if you’d be interested. Fruit pies, nuts pies/tarts, custard pies. . . all with excellent crust. It would be in Portland, OR on a weeknight evening or weekend afternoon, 2+ hours.

Happy Thanksgiving!

Apple Pie

apple pie front porch

This is a pretty classic apple pie. You don’t want to slice the apples too thinly or they’ll get mushy in the pie but too big and you’ll end up with rubbery chunks. It also depends on the kind of apple. If in doubt, slice fairly thinly. This is my all-time favorite pie dough; it’s simply butter, salt, flour and water but the technique is revolutionary. Once you do it a time or two it becomes second nature so don’t be put off by the extra step. Or use your favorite pie dough recipe.

7-ish medium-large apples (you want 7-8 cups sliced), peeled, cored and sliced
½ cup sugar or 1/4 cup sugar and 1/3 – 1/2 cup apricot or peach jam–see headnote
1 tablespoon cornstarch
¼ teaspoon cinnamon
¼ teaspoon nutmeg (optional)
Just a little grated lemon zest (optional)
2 teaspoons lemon juice (if apples are a bit bland)
1 1/2 tablespoons butter, cut into small pieces
1 recipe pie dough which is enough for a 1 double-crusted 9-inch pie (I use 1/3 whole wheat pastry flour and 2/3 all purpose for a more interesting texture and flavor–the technique here keeps the crust flaky and perfect even with a higher ratio of whole wheat–spelt or rye flours would be great alternatives to the whole wheat pastry)

Preheat oven to 450 F.

Put the apples in a large bowl. Mix the sugar, cornstarch, cinnamon and nutmeg (if using) and lemon zest and jam (if using) together in small bowl. Sprinkle it over the apples and mix well. Drizzle on lemon juice (if using).

Place one disk of dough on a lightly floured surface (right on the counter is easiest unless you have a tile counter). Lightly flour each side of the disk and a rolling pin. Roll from the center out and roll the dough until you have about a 14-inch circle. You want to make sure the dough does not stick to your work surface and slide a spatula under it to loosen up if it does and sprinkle more flour on the counter. The edges of the circle may crack a part but just pinch back together and don’t worry too much about the very edge since it’s going to get crimped anyway. Roll the circle of dough up onto the rolling pin and transfer it to your pie dish, unrolling gently. Lightly press the dough into a 9-inch pie pan and make sure the dough goes all the way out to the edges or the base of the pie pan. Roll out the second disk of dough.

Fill the pie shell with the apple mixture. Dot filling evenly with butter. Carefully lay the top crust over the apples. Trim the overhanging dough with a sharp knife all around leaving at least a 1-inch overhang. Flour your fingers and crimp the two layers of pie dough together by pushing your right pointer finger into a “v” shape created with the thumb and pointer of your left hand, holding the edges of dough. Repeat around the whole pie, re-flouring your fingers as needed. Prick the top of the pie a few times with the tines of a fork to create holes for the steam to escape.

Bake the pie at 450 degrees for 10 minutes then reduce the heat to 350 and bake another 35-45 minutes until the apples are tender and the crust is flaky and just slightly golden. Cool on a rack and serve warm or at room temperature with lightly sweetened whipped cream or vanilla ice cream.

Gratitude

Thanksgiving is upon us. I have done little thinking about the food for the meal. As I’m sure many of you are, I’ve been thinking about the tragedies and injustices near and far. My heart aches for the millions who have nowhere safe to be, whether fleeing their home country or homeless on the streets of my hometown.

I will get to celebrate and enjoy a meal in a warm cozy house surrounded by family and loved ones. I count my blessings daily.  And I think I’ll keep my culinary contributions simple and will support a couple of organizations (here in Portland, OR) who help provide comfort, stability and warmth to those who have the least, such as Streets Roots and Sisters of the Road!

Happy Thanksgiving!

roasted squash w: salsa verde

Winter Squash with Parsley Sauce

Warm, sweet, roasted squash with a cool, lemony parsley sauce is an easy and beautiful dish.

Roast winter squash in a hot oven, 425 – 450 degrees. Roast however much peeled, seeded squash you’d like. I like bite-sized chunks or wedges.

Make salsa verde (just a mixture of finely chopped parsley, minced garlic, lemon juice, olive oil and salt) and top the squash with plenty of salsa.


Good Soup on the Fly

bean winter squash soup parsley pistouYou never know when that cup of cooked beans or chunk of roasted butternut squash will come in handy. Little time to think about what to make for dinner and little time to actually make it?

How does one turn random bits of already cooked ingredients into something delicious? Yesterday’s example . . . friend comes over for dinner but no real plan or time to be fancy. I had about 1 cup of cooked white beans and about as much bean cooking liquid, a rich, silky base for a soup. Also present, about 2 cups of already roasted butternut squash, some of it very soft and some of it still keeping its shape. I had a small chunk of celery root and I always have onions, potatoes and garlic on hand as well as veggie bouillon base (water would have been just fine since the bean broth was flavorful) in the freezer. The garden offered up a handful of parsley and a few leaves of sage.

Soup is a handy format for on-the-fly, no-plan cooking but to make it good–in the absence of time for lengthy simmering–it needs more than vegetables, grain, broths, etc. In this case a handful of chopped parsley and garlic clove and some salt, chopped/mashed into a paste and thinned with some good olive oil made it good. Sometimes soy sauce and/or fish sauce to finish does the trick, other times a slice of bacon, diced and added to the saute-ing onions does it.

parlsey garlic pistou

But to start, think of those beans and roasted vegetables as building blocks, really tasty and efficient ones, to make soup. Happy Cooking!

Simple Vegetable Soup with Parsley “Pistou

This is merely a template for a nice warming bowl of soup. Adapt and substitute to suit your tastes and needs.

Serves 4-ish

2 tablespoons olive oil
1 onion, diced
1 teaspoon sage, fresh or dried, chopped (or thyme, oregano, marjoram. . .)
2 medium potatoes, diced fairly small (for quick cooking)
1 cup celery root, diced
1 cup cooked beans (white, pinto, cranberry, chickpeas. . .)
1 cup bean cooking broth
2 cups roasted winter squash, diced (or use raw if that’s what you have and add it when you add the potatoes)
2 – 2 1/2 cups veggie bouillon broth or water or chicken stock  (use more or less depending on how thick/thin you want your soup, you can always thin it out at the end)
1/3 cup parsley, finely chopped
1 clove garlic, minced
1/2 teaspoon coarse sea salt
Olive oil

Heat the olive oil in a soup pot over medium-high heat. Add the onion and cook, stirring often, for about 5 minutes until the onion softens. Add the celery root, potatoes and sage and mix well and cook for another 5 minutes. Add the beans, bean broth, squash and stock and bring everything to a simmer. Cover partially and cook for 10 minutes or until the potatoes are tender and beginning to fall apart.

Meanwhile use the side of a chef’s knife to mash the sea salt into the minced garlic and then mix it around on the cutting board with the finely chopped parsley and make a rough paste. It doesn’t need to be uniform. Put it in a bowl and add a couple tablespoons good olive oil; it doesn’t need to totally emulsify, as you can see.

Taste the soup and adjust seasoning with salt and or a splash of vinegar if it’s bland. Serve hot or warm and top with the parsley garlic garnish.

Seven Years of Learning and Cooking with You All!

Seven years ago this week I taught two classes in my home kitchen to a handful of you. Then I taught a series of classes at Zenger Farm to a dozen of you. And I bought the url cookwithwhatyouhave.com and the rest is history, I suppose.

I set out to spread the joy and deliciousness of simple, everyday cooking with in-season vegetables and whatever your pantry had to offer. I still believe that cooking can simplify and improve our lives. And I believe that knowing farmers/farmworkers, far from a cliche, is one of the best and most important things we can do.

tomatoes roasting in cast iron pan
Roasting tomatoes to freeze for gloomier months. . . one the treasures in my “prepared pantry” that adds so much flavor with no effort in the moment.


Some things happened along this cook-with-what-you-have journey:

I credit Carol and Anthony Boutard of Ayers Creek Farm for my love of beans which has fundamentally changed the way I eat and teach.

47th Ave Farm and Sun Gold Farm  and Sauvie Island Organics started me down the path of writing customized recipes for CSA farms and eventually launching the Seasonal Recipe Collection.

Leslie Cole, then at the Oregonian (now at Grand Central Bakery) wrote this piece about one of my students and my Eat Better class series which solidified Cook With What You Have’s place in this wonderful community of food/farm-related businesses.

Photographer Andrea Lonas brought Cook With What You Have to life visually with beautiful photography on and offline.

Culinate asked me to write a monthly column which became an avenue to celebrate seed breedersCSAs, Slow Food, parsley and homemade veggie bouillon!

The Portland Farmers Market tirelessly promoted my cooking classes and its many neighborhood markets are the source of most of of the fresh produce for classes, testing, etc., as is the fabulous Hillsdale Farmers’ Market.

Clackamas County and Columbia Sportswear’s wellness departments hired me to teach Cooking & Eating Classes with employees. We do just that and it’s wonderful!

Betty Izumi, PSU Public Health professor and genius behind Harvest For Healthy Kids (a program created within Head Start) brought me on to work with them to bring cooking to Head Start families. Never have I learned more!

FoodCorps lets me cook for and participate in their extraordinary retreats.

And hundreds of you stuck with me, reading and commenting on this blog, attending classes, eating your way through my experiments, sending messages that you “cooked-with-what-you-had,” giving me new ideas, hiring me to teach all over the place, sharing excess produce and much more!

This list is far from complete but thank you to all of you, you know who you are, who have grown Cook With What You Have with me for all these years. I look forward to many more years with you all!

And I made this dish from my very first cooking class menu for lunch today:

Kale Bruschetta

Sauté chopped kale in olive oil with a clove or two of chopped garlic and a pinch of salt. Add water to keep things moist. When tender pile it on toasted bread that you’ve rubbed with a garlic clove and top with plenty of good olive oil and salt.

braised kale bruschetta

Apfelkuchen

apfelkuchen prep

There are many apple confections that fall under this general title but I grew up with this particular one, a barely sweet apple tart really, and it will always have a special place in my heart and repertoire. It’s the same crust and preparation as the Zwetschgendatschi but I always make it in a half sheet pan. . . it’s wonderful for days and makes a fine breakfast, with or without whipped cream!

Feel free to halve the recipe but then you have to deal with splitting an egg–or make the full crust recipe and freeze half the crust for a future use. I have been using Lonesome Whistle Farms pastry flour in this recipe with great success and have even added some of their Red Fife bread flour for wonderful flavor and texture.

This most recent time I ran it under the broiler (for maybe 30 seconds too long, though I kind of liked the slightly burnt bites) for a little more caramelization. Watch it carefully if you do!

apfelkuchen

Apfelkuchen

Serves many

250 grams unsalted butter (2 sticks and 2 1/2 tablespoons) at room temperature
65 grams (1/3 cup) sugar
Zest of half a lemon (optional)
1 large egg
400 grams (3 cups) flour (I use half all purpose and have whole wheat pastry flour–see headnote)
1/2 teaspoon salt
6-7 lbs apples, peeled, cored and thinly sliced
2 teaspoons cinnamon
1/3 cup sugar

Preheat oven to 375 degrees.

Cream the butter, sugar and lemon zest, if using, in a large mixing bowl with a wooden spoon. Add the egg and incorporate well. Add the flour and salt and carefully incorporate it. I often resort to using my hands here. The dough should come together fairly easily and be soft but not sticky.

Put the dough in the middle of a half sheet pan (13″ x 18″) or equivalent baking sheet or two. The sides of the half sheet pan are low enough that I can use my rolling pin to flatten out the dough and spread it around the pan. I use my hands to get it into the corners. This takes a little doing but you should have plenty of dough to cover it easily to a depth of about 1/4-inch.

Now make rows of apple slices, fit tightly together, until the crust is covered. Sprinkle evenly with cinnamon and sugar and bake for about 40 minutes until the edges of the crust are browning, the apples are soft and browning and the sugar is caramelizing. Run under the broiler for just a minute or two if you want more color on the top–see headnote.

Serve warm or at room temperature, cut into squares, with just barely sweetened whipped cream.

Guten Appetit!

Fall Beauty: The Last of the Peppers and Tomatoes

tomatoes roasting in cast iron pan

It’s breathtaking, almost painfully beautiful in the Willamette Valley in Oregon right now. My mother and I, every fall on day’s like today, talk about this time of year in that–so-beautiful-it-hurts kind of way. The air is different. 75 degrees in late September does not feel like 75 degrees in early August. Colors are more intense and the light has shifted enough to feel almost wistful in its beauty.

Work is busy, school and sports schedules are all over the map and produce is abundant. Those intense colors reflect my general feeling this time of year. . .. immensely grateful for all I have and slightly on overdrive to preserve all that accumulated sunshine for the cooler months and take advantage of the waning summer produce on our plates every day.

I roast batches of tomatoes with salt and olive oil; sauce types, slicers, cherry types, all in the same pan because it works just fine. I may use some to dress a pasta dish or spread on sandwiches or stir into a soup or I may freeze the whole batch, in pint size containers, for less intense times.

I’ve also been making one of my favorite dishes from my time in Southern Italy (Calabria) 25 years ago. It’s nothing more than potatoes and sweet red peppers pan-friend.

Calabrian peppers potatoes II

The peppers are a sweet and smoky and the potatoes both creamy and crispy and plenty of sea salt keeps you eating this simple concoction beyond your better judgement.

Happy fall!

Calabrian-style Fried Peppers and Potatoes

Sweet, salty and a bit charred . . .This was one of my very favorite things to eat when I lived in Calabria (the toe of the Italian boot) 25 years ago. It doesn’t really get any simpler but you need to be brave with the heat and have good ventilation. And don’t skimp on the oil either.

Serves 3-4

3-4 sweet red peppers, washed, cored and seeded and cut into chunks about 1 ½ – 2 1/3 inches
3-4 medium firm fleshed yellow potatoes, well scrubbed (no need to peel) and cut into bite-sized chunks.
3 tablespoons olive oil (or a bit more if things dry out)
Sea salt

Heat the oil in the largest, heaviest skillet you have. When it’s hot but not smoking add the peppers and potatoes and toss well to coat with oil. Cook on high heat, stirring frequently until the both potatoes and peppers are tender and almost blackened around the edges. Season liberally with sea salt. Serve hot.


Cook With What You Have. . .

nicoise prep
No olives, no lettuce, not a traditional vinaigrette (and herby green sauce thinned out with mayonnaise), but the makings of a great Nicoise Salad a la cook with what you have.

I’ve been testing recipes on my Seasonal Recipe Collection that do not have photos. They don’t have any, either because I wrote them long before I launched this part of the site and was not so focused on images, or in some cases because I wrote the recipe without actually making the dish. Yes, there are a few of those on the site . . . I only write and post recipes I know will stand a very good chance of working and being tasty (though people’s tastes do vary widely) even if I haven’t made the dish exactly as written.

It’s been so fun to work my way through the site as vegetables come into season and I take advantage of testing as many things as possible with, say Anaheim or poblano peppers or escarole or beets. Last week we had escarole three ways for dinner–wilted; in a barley risotto with red beans; and in a salad with toasted filberts, apples and blue cheese.

escarole three ways

I’m often able to make three, sometimes four dishes in one afternoon and get them photographed and the recipes edited and images uploaded before I go to bed.  My point is, cooking through recipes that I wrote this time of year (in years past) does not mean lots of trips to the store. I stumbled upon shelling beans at my local market recently and remembered that I had several dishes with shellies that needed re-testing and photographing. I headed home and tested an old pasta dish (inspired by a decade-old Pastaworks newsletter) with a shelling bean, tomato, bacon and basil sauce.  The tomatoes and basil were in the garden, the bacon in the freezer and the pasta in the pantry. Yes, the original recipe called for fresh egg tagliatelle and pancetta but a box of penne pasta and a few slices of bacon from the freezer were perfect.

shelling beans bacon tomato sauce for pasta

Make it your own–all of it! Use the herbs you like or have growing in the garden, skip the lemon and use vinegar. . . whatever it is just make something!  And if you haven’t subscribed to the Seasonal Recipe Collection you might check it out. . . it is getting deeper and more colorful everyday and should have some inspiration for everyone!

green harissa prep
Making a green “harissa” just to see what it might be like. It is delicious.


Green Harissa

Yields about 3/4 cup

2 large Anaheim peppers, roasted under the broiler or directly on a gas flame until blackened and blistered all around and then put in a covered dish to steam and cool
1 Jalapeno pepper, roasted under the broiler or directly on a gas flame until blackened and blistered all around and then put in a covered dish to steam and cool
1 Serrano pepper (the one I used in the photographed version happened to be red)
2 cloves garlic, chopped
1 teaspoon cumin seeds
1 teaspoon caraway seeds
1 teaspoon coriander seeds
1/2-1/3 cups cilantro, chopped (including stems and roots if you have them)
2 tablespoons mint leaves
Salt
2 tablespoons olive oil
1-2 teaspoons lime or lemon juice (just to brighten things up a bit–start with 1 teaspoon)

Toast the seeds in a small, dry skillet for about 2-3 minutes on medium heat until fragrant and a shade darker. Put the seeds in a mortar or spice grinder and grind fairly finely.

When the roasted peppers are cool enough to handle, peel and deseed them (or leave the seeds in for more spice) and roughly chop. Chop the fresh (un-roasted) Serrano as well. Put all the peppers in a food processor with the garlic, herbs, ground spices, oil and salt. Process until smooth. Taste and add lime/lemon juice to taste. Store in the refrigerator for up to a week.
Serve it with meat, fish, eggs, grains, beans or any way you would use regular harissa.

Can’t Keep Up with the Cucumbers?!

I just barely am! And in great part it’s thanks to this simple, delicious technique. I’ve made versions of this quick-pickled dish for years but Lynne Curry’s version in Pure Beef is my latest inspiration. They’re delicious within 20 minutes of making and stay crisp and bright for a week.

Whittle down that pile of cukes and find yourself snacking on these, putting them on burgers or any sandwich, enjoying them with rice or grilled tofu.

Quick-pickled Cucumbers
–adapted from Pure Beef by Lynne Curry

quick pickled cucumber salad

This is perfect alongside a good hamburger or some thinly sliced flank steak or meatloaf (as Lynne does) or with rice or other grains or seafood or just as a snack.

2 medium cucumbers, washed but not peeled unless the skin is very thick
2 tablespoons rice wine vinegar (or more, to taste)
2 teaspoons sugar
1 teaspoon soy sauce (or tamari)
1/4 teaspoon sea salt
Pinch or two of red pepper flakes

Slice the cucumbers in half lengthwise and use a teaspoon to scrape out the seeds and discard. Slice the cucumber haves very thin on the diagonal and put them into a bowl. In a separate bowl, whisk the rice vinegar, sugar, soy sauce, salt and pepper flakes until the sugar dissolves. Pour the dressing over the cucumbers, stir, and let the flavors develop at room temperature for about 20-30 minutes. Store in the refrigerator for up to a week.

A Tribute to Henry

Henry dog

Henry ran off the path in to the woods just a few days ago and returned with an apple in his mouth. He loved fruit. He was my mother’s faithful companion for almost 15 years. Henry, whom my mother referred to as a puppy his whole life, decided it was time to call it quits yesterday. He was buried with a big, sweet Gravenstein apple.

He lived a glorious life out in the woods and loved my mother so. In his old age he’d bark incessantly if someone was talking to her and keenly felt the competition of the new grand child in the house. He stuck close to her right heal most days. Henry you will be missed!

Go eat a beautiful piece of fruit in his honor or make a peach cobbler or an apple pie!

One Eggplant, Two Tomatoes, Handful of Basil, a Little Parmesan

eggplant tomato rounds plated

The CSA share comes every Tuesday evening which means Tuesday dinner is the use-up-last-week’s share night. Tonight that meant one lovely globe eggplant and two tomatoes. Time was short so I browned eggplant rounds in the cast iron pan, topped them with whole basil leaves, slices of tomato, salt and olive oil and broiled them until the tomatoes softened and started bubbling, then I topped them with grated Parmesan and passed them under the broiler for another minute or two.

It’s only a slight stretch to say that we got individual eggplant Parmesan rounds in a matter of 15 minutes. It’s a keeper in any case. I’m sure a mix of oregano and basil would be good too and of course a more typical preparation would have used thick slices of mozzarella but I loved this version.

Happy Summer!

P.S.  I just added my 600th recipe to my Seasonal Recipe Collection and am proud of what this resource has grown in to. Subscribe if you’d like to have access to all these recipes and tips and ideas to keep your table full of home-cooked goodness all year long.

eggplant tomato basil rounds

Serves 4

1 medium globe eggplant (save a few for garnish)
2-3 medium-large slicing tomatoes, cut into 1/3-inch thick slices, on the equator
1 cup basil leaves
Salt
Olive oil
1/3 – 1/2 cup grated Parmesan

Turn on the broiler

Slice the eggplant into 1/2-inch thick rounds. Heat a little olive oil in a large skillet. Cook the rounds, sprinkled with salt over high heat until brown on both sides, about 5 minutes for the first a bit less for the second side. Put the browned rounds on a baking sheet.

Top each round with a few basil leaves, then a slice of tomato, a sprinkle of salt and drizzle of olive oil.  Set the pan under the broiler and broil until the tomatoes have softened and are bubbling a little. Remove from the oven and divide the Parmesan between all the rounds. Return to the broiler for another minute or two until melted and browning. Garnish with chopped basil and serve.


A Little Rice, A Lot of Herbs

herbs leftover rice

I’ve had 1/2 cup of leftover rice in the fridge since last Saturday. I had 1/3 bunch of dill beginning to yellow at the tips and same with cilantro. I added a handful of parsley and I had 1 1/2 cups chopped herbs. I put some oil in a skillet, heated the rice, scooted it to one side, cracked an egg in. Then I took out the egg, turned off the burner and stirred the herbs and a few pinches of salt into the warm rice. The whole thing went into a bowl, topped with egg and Sriracha. Perfect lunch on a hot day!

That ratio of herbs to rice was inspired by Sabzi polo the Iranian dish with loads of herbs and rice. This is my 5-minute, totally oversimplified version.  You could easily scale this up for more people. Leftover rice, like for any fried rice, will work much better than fresh. Freshly cooked rice will be too sticky.  I always cook twice as much rice as I need and freeze the rest to use for dishes such as these.

herbs leftover rice egg

And now two containers of things needing to be used are no more. Waste not, want not!

Vegetables in Quantity!

bok choy

Let’s say you look up bok choy recipes, for example or recipes that use parsley, you’ll find a huge variety of course but many, if not most, will call for 2-4 cups of sliced bok choy or 2 tablespoons of parsley or maybe a full bunch if you land on tabbouleh. If you are a member of a CSA or have a vegetable garden or shop regularly at a farmers’ market these recipes, as written, may not do you much good.

If you get the CSA I do (and LOVE!) you may get 2 large heads of bok choy that would translate to 8 cups sliced, each, and 2 robust bunches of parsley. That’s how these things grow and are best distributed at certain weeks out of the year. Or cabbage, another perfect example… sauté a lot of cabbage in a huge skillet with nothing but olive oil and salt and then eat it and report back. I bet you can enjoy/devour a lot more cabbage (of any kind) than you might think in one sitting. Of course many of the vegetables, when cooked or dressed, reduce their volume several fold so you won’t necessarily be looking at a mountain of vegetables on your plate, though that’s never a bad thing for me!

I love eating vegetables in this quantity–it moves them to the center of the plate. And of course that’s how most health gurus suggest we eat but I don’t always see this reflected in recipe writing. It is changing and folks like Heidi Swanson of 101cookbooks.com and Yotam Ottolenghi and Bryant Terry and many others have been leading the way on this approach for a years actually.

So today, as I create yet one more recipe for bok choy (which I have come to love because of having a CSA for years) I will let it shine with a simple dressing and find something to round it out, but it matters not much–an egg, a bowl of rice. . . . And if you’re ever at a loss for what to do with that gorgeous bouquet of parsley I just noticed that I have 40 recipes using parsley on my Seasonal Recipe Collection.

So if you get a CSA or have a garden or generally have access to produce in this quantity, thank your lucky stars and triple the quantities of vegetable or herb often noted in recipes and enjoy all that veggie goodness at the center of the plate!

bok choy dressing prep

Warm Bok Choy with Ginger Dressing

1 large head bok choy or joi choy, well washed and both stems and leaves thinly sliced crosswise
2 teaspoons coconut, peanut or other oil

Dressing:
Juice of 1 lime
1 tablespoon rice vinegar
2-3 garlic cloves, minced and mashed up a bit with the side of a chef’s knife with some salt, or pressed (the salt makes it easier to mash)
2 teaspoons finely grated fresh ginger
1 teaspoon fish sauce (optional)
2 teaspoons soy sauce
A little more salt if needed
1 teaspoon toasted sesame oil
1/4 teaspoon red pepper flakes

Heat the coconut oil in a wok or large skillet until very hot. Toss in the bok choy stems and a few pinches of salt. Cook over high heat, stirring regularly, for about 2-3 minutes until the stems are softened but still have some bite. Add the leaves and cook for 30 seconds more. Put the vegetables in a bowl and mix in the dressing. A fair amount of liquid (combination of dressing and liquid from vegetables) will accumulate in the bottom of the bowl and it’s delicious and rice soaks it up well!

bok choy ginger dressing


The Bean Challenge!

corona beans garlic scapes
Corona beans (Rancho Gordo Beans) with roasted garlic scapes, pine nuts and parsley, scallions & lemony vinaigrette.


It’s hot in Portland, Oregon, very hot, this week. Every summer (earlier this year than usual!) I have moments where I’d rather not be in the kitchen from 5-7 pm. Much of the year I’m happy to be but not when it’s really hot. What does this have to do with beans?

domingo rojo beans farro salad
Domingo Rojo beans (Rancho Gordo) with farro and cilantro and lemony vinaigrette.

I typically put a big bowl of dry beans out to soak in the evening (I do this year-round) and then in the morning before I get breakfast and school lunch ready I drain the beans, cover with fresh water, add a few aromatics and turn them on to cook. By the time we head out the door for school the beans are done (more details below). And that means I have the base of many a meal cooked before it begins to get truly warm in my kitchen. *And no need to soak if you have another method you like. Just cook beans!

white bean parsley harissa quesadilla
Zolfino beans (Ayers Creek Farm) with harissa, parsley and sharp cheddar.

Those beans then turn into quesadillas or tacos of all kinds; salads, beans and rice (the rice often having been cooked at some earlier time to and just needing to be reheated), quick chili, soups and dips. Yes, there’s some cooking involved to make them meal worthy but it’s pretty simple and when you have home-cooked beans and their attendant flavorful broth much of the work is done. There are many more bean recipe on the Seasonal Recipe Collection!

beans rice spicy green sauce
Purgatorio Beans (Ayers Creek Farm) with spicy green sauce and rice.

So, the challenge is to cook a pot of beans, a new kind maybe, just for fun and tell us about in a comment here. Let’s savor the simplicity, flavor and flexibility of beans in the summer!

black beans rice Ellis
Black turtle beans (Sun Gold Farm) with brown rice and cilantro and my lovely son who loves rice and beans.
beans soup herbs harissa radish
Pinto beans (Sun Gold Farm), Mayacoba beans (Rancho Gordo), bean broth, herbs, radishes, harissa.


The two most important things you can do to get hooked on cooking your own dry beans are:


1)  Cook a lot of beans at once since they freeze so well, once cooked and covered in their cooking liquid. That way you have them on hand for quick meals when you’re short on time–just try to remember to put them out to thaw on the counter in the morning or the night before.


2) Let the beans cool in their cooking liquid for at least 1-2 hours. This vastly improves their flavor and texture. You do not need to refrigerate them while they’re cooling. Just leave them in the pot on the stove (with burner off) until they’re cool. Then refrigerate what you think you’ll use up in 5 days and freeze the rest. Keep as much of the cooking liquid as you can–it’s wonderful in soups, as a broth on its own, to loosen up beans when making a spread or refried beans, etc. and it also protects them in the freezer.


Place dry beans in a bowl covered by about 4 inches of cold water. Soak over night or 6-8 hours. Drain beans.


Place soaked beans in a large pot and cover with cold water by several inches. Add a couple of whole, peeled garlic cloves, a bay leaf and a chunk of peeled onion. Bring to a boil, turn down to a simmer and let cook covered until the beans are tender, stirring occasionally (this helps prevent some beans from softening before others.) I add salt towards the end of the cooking time and when you do add salt, be generous, as in at least 1 teaspoon sea salt for every 1 1/2 cups or so of dried beans. They will likely need more still. The time it takes for the beans to cook will vary depending on the kind/size of bean and the freshness of the dried beans. Pinto and borlotti types typically take about 30-35 minutes, smaller white and black beans as little as 20-25. Let beans cool in their liquid (see above) and then use, freeze, etc. If you’re freezing some, fill your container with the beans and then ladle in the cooking liquid until the beans are covered. Cooked beans also keep in the fridge for 5-6 days and for several months in the freezer.

Using up the Bits and Pieces aka “Wunderreis”

wunderreis

Growing up (in Germany) I loved to eat “Wunderreis” (wonder rice) at my godmother’s house. Her mother had made it and she made her own variations. As far as I recall it was rice with whatever bits of vegetables and sometimes meat, and various herbs and spices that seemed appropriate or happened to be within arm’s reach. She was raising four boys and the four of us (my siblings and I) plus all the parents made for a pretty hungry crowd and the pots of Wunderreis seemed to stretch to accommodate all of us. I remember Indonesian-like versions with curry and raisins and carrots and more middle-European version with peas, carrots, and broccoli and grated cheese added at the end.

Last night, after a long day of teaching and meetings I opened the fridge at 6pm to figure out what to make for dinner. The odd bits of vegetables and herbs and the quart of brown rice and two sausages in the freezer came together into a beautiful pan of Wunderreis.

Note: when I looked up Wunderreis I discovered that most all references to this word nowadays refer to the German word for the fraught Golden Rice, to which this post and this dish has no connection even though the turmeric in my version gave it a lovely golden hue!

wunderreis prep
I happened to have fresh turmeric, bottom center of photo, but by all means use powdered if you don’t have fresh. I did not end up adding the chunk of sharp cheddar, in the corner of the photo above, as it didn’t seem needed or complementary.

Wunderreis

I used brown Jasmine or basmati (I can’t quite tell) that I had frozen a few weeks earlier. I always make more rice than I need in the moment for just these occasions which is especially useful with brown rice since it takes twice as long to cook. I thaw it by putting it in a pan with 1/2-in or so of water and heating it on medium heat, covered, until I can break it apart. It thawed with this technique in the time it took me to chop and saute the vegetables. If you have a microwave I’m sure that would work too.

As per usual, use whatever vegetables, spices, herbs you want/have on hand and feel free to omit the meat and top with toasted nuts or seeds, etc.

Serves 4

Olive oil
3-4 cups rice (see headnote for how to thaw in a hurry if using frozen), brown, white, short grain, long grain, etc. (or frankly any cooked grain)
1/2 a medium onion, diced
2 cloves garlic, minced or 2 stalks green garlic or garlic scapes
2 pork sausages (or whatever you want to use or omit–see headnote), sliced
4 cups or more, vegetables, chopped into small-ish bite-sized pieces. Carrots, turnips, radishes, peas, scallions and green garlic are what I used here.
1 teaspoon ground turmeric or 2 teaspoons grated, fresh turmeric
Salt and black pepper
Several pinches of red pepper flakes (optional)
1/2 cup or more tender herbs (basil, parsley, chives, . .)

Heat a couple of tablespoons of olive oil in the largest skillet you have. Add the onions, sausage, if using, garlic and all the vegetables. Season with few few pinches of salt and cook gently (I don’t brown them really in this dish), covered until tender.

Stir in the rice and mix well. Heat through and finally stir in the herbs. Stir in a tablespoon or two of the best olive oil you have. Serve hot! Top with Sriracha or other hot sauce if you like!

What It Takes

SIO Lettuces
Lettuces at Sauvie Island Organics

For as much time as I spend working for and with farms I spend a very small amount of time actually on farms. I recently spent several hours at Sauvie Island Organics and in that time learned more about soil ecology, biology and chemistry and related strategies employed to bring a palatable variety of produce to my table, than I can convey here.  I don’t fully understand how cover crops create conditions in the soil to enable minerals and nutrients of all kinds to be available to both the plant and eventually us, the eaters. I can’t imagine the complexity of having a handful of different soil types on one small farm and the different methods and crops rotations it takes for each one to produce delicious and nutritious food year after year.


All this to say, I was reminded of Slow Food Founder Carlo Petrini’s point that farmers are some of the most skilled workers on earth and that we should hold them in the same esteem we hold folks with PhD’s (and paid accordingly and that’s up to us eaters in great part). And I was humbled to really stop and think about what it takes to grow the produce I eat every day.  So, as CSA and farmers’ market season come into full swing I want to thank all the farmers and producers–the ones who fight with row cover on windy days; who plant gorgeous (and useful) swaths of flowers to attract the bugs that then eat the harmful bugs in the neighboring plots; who manually weed the onions so they grow big and juicy; who harvest and wash and pack a dozen varieties of greens each week–for ALL they do so that we can eat and thrive. Let’s make them thrive! Sign up for a CSA, shop your local farmers’ market and get a glimpse of what these farmers are doing for our soil, water, flora and fauna, not to mention our communities and our table. The future of food is the future!


SIO kale
Kale at Sauvie Island Organics

Salad, Soup, Patties: One Ingredient, So Many Options

aspargus bulgur mustard greens lemony vinMaria Speck (author of cookbooks Simply Ancient Grains and Ancient Grains for Modern Meals) is inspiring, knowledgable and endlessly creative when it comes to this vast category of flavor, texture, culture, . . . Hearing her talk about her youth in Greece and Germany and her mother’s simple, deeply flavorful, fresh food and her own many decades of cooking all over the world made my mouth water. Her philosophy echoed mine: fresh produce and simple staples, cooked at the beginning of the week, can be the foundation of many a meal. She reminded me of bulgur. I have neglected my jar of it for many months and I had a busy week so I figured I’d cook a pot of it and see how I could use it throughout the week.

Monday: Salad of roasted asparagus, mustard greens, arugula, radishes, bulgur, toasted sunflower seeds and a lemony vinaigrette (recipe below).

Tuesday: Added bulgur to chicken soup for my son’s school lunch.

Wednesday: Black beans in their broth topped with bulgur (that I had toasted in a small skillet in some olive oil which gave it an extra dimension), cilantro and harissa.

Thursday: Broccoli and bulgur patties with cilantro, eggs, a bit of sharp cheddar and more harissa (recipe on the Seasonal Recipe Collection).

Greens, Asparagus and Bulgur Salad with Lemony Vinaigrette

Serves 4-6 depending on what else is being served

3/4 cup cooked, cooled bulgur (see below)
7 or so fat spears of asparagus (I prefer the fat ones for this but any will do)
Salt
Olive Oil
3-4 radishes (optional but beautiful and delicious), washed and cut into small dice or thinly sliced
5-6 cups tender, spicy greens like mustard greens, arugula, mizuna or any chicory, washed, dried and cut into ribbons or bites-sized pieces (I used mustard greens and arugula in this version)
1/2 cup cilantro, leaves and stems, chopped
2 scallions, white and green parts, thinly sliced
1/3 – 1/2 cup toasted sunflower seeds (toss raw seeds with a little olive oil and salt and spread on sheet pan and roast for about 10 minutes at 350 until golden)

Vinaigrette
2 teaspoons Dijon-style mustard
2 cloves garlic, minced and mashed up a bit with the side of a chef’s knife or put through press
2 tablespoons lemon juice (or cider or red wine vinegar)
5 tablespoons olive oil
Salt and freshly ground pepper

Set your oven to broil. Snap off the tough ends of the asparagus. Put the washed spears on a sheet pan and drizzle with just a little olive oil and sprinkle with salt. Broil, turning once, for about 10 minutes until browning and tender. Remove from oven and let cool. Slice into 1/2-inch slices on the bias.

Whisk the dressing ingredients together in a small bowl or shake them up in a tightly sealed jam jar. I make this type of dressing in a jar and top if off as needed all week. You may have more dressing than you need for this salad so the jar method is a good one here.

Put all the salad ingredients in a large blow. Add about 3/4 of the dressing and toss well. Taste and adjust with salt, lemon, etc. and/or add more dressing. Serve immediately.

To cook the bulgur: Bring 1 3/4 cups water or broth (I used homemade veggie bouillon broth) and several pinches of salt (if you’re using water) to boil in a saucepan. Add 1 cup of bulgur and stir well. Simmer the bulgur, covered for 10 minutes. Turn off the burner and keep the pan covered and let the bulgur steam for 10 more minutes. Fluff with a fork and use as needed. Store in the refrigerator for up to 5 days.

moro beans bulgur harissa
Soupy black beans topped with bulgur (warmed up by toasting in a skillet with some olive oil), cilantro and harissa.


Don’t Do What I Do . . .

. . . or at least not to the letter! What I have in my pantry, fridge, freezer, garden is likely not exactly or not at all like what you have. Often, when I write recipes for the Seasonal Recipe Collection or this blog or just post a photo on Instagram I say things like “use what you have” or “substitute x for y” or “if you don’t have this use that!” This may get annoying but my hope is of course, that this approach is freeing and gives you control and creative license. It’s also economical, quicker.

I was talking about slaw the other day and a friend mentioned that her slaw includes x, y, z, etc. and I imagine many of you have THE slaw that you make but I realized that I’m not sure I’ve ever made the same slaw twice. I’m sure those slaws are delicious but do they get made when there’s only a browning wedge of cabbage left in the fridge, maybe a few carrots and a chunk of red onion, a wilty half-bunch of cilantro and just a few sprigs of mint in the garden? That list may not sound appealing but I guarantee you the sum of those parts will be great and fresh and bright. And if you’re like me, you’ll feel smug and satisfied that you cooked with next to nothing. My grandmother (and mother!) would be/are proud. And of course fresh, newly purchased vegetables make wonderful slaws too so no need to wait until the wilt sets in but don’t forget that slaw idea if time takes its toll!

Less waste, more creativity, fewer rules. . . . are a few of the principles that get my going. However, I also know that the fun of this kind of cooking, i.e. using recipes as a template or loose guide, often comes with experience and years of experimentation and comes more easily to some than others. Temperament seems to play a big role here. But whatever your experience level or temperament I hope that there might be some new or continued fun to be had in cooking-with-what-you-have and to your taste!

Cabbage and Tatsoi Slaw w/ Miso Dressing

I never tire of slaws and this is a quick, delicious one. As usual, substitute other kinds of cabbage or greens or herbs. Mint would be wonderful here instead or in addition to the cilantro. Any kind of miso will do but I tend to keep red miso on hand so it’s what I typically  use.

savoy tatsoi slaw miso dressing

Serves 4

1/2 small head savoy or regular green cabbage, cored and very thinly sliced
1 small bunch tatsoi, washed, dried and thinly sliced
Handful cilantro, roughly chopped, including stems (or other herbs, see headnote)
Handful radishes, trimmed and thinly sliced (optional)

Dressing:
2-3 teaspoons red miso (see headnote)
1 tablespoon mirin (rice cooking wine or a bit  more rice wine vinegar and a pinch or two of sugar)
1 tablespoon rice wine vinegar
1 tablespoon peanut oil or other oil
Juice of half a lemon or lime
1 clove garlic, minced (or 1 stalk green garlic, minced)
Back pepper and a possibly a little salt–probably not needed as the miso is salty

Put the vegetables and herbs in a large salad bowl. In a small bowl mix the dressing ingredients together well. Toss the salad with the dressing, taste and adjust seasoning.